Iceland's Most Photogenic Location
Jökulsárlón is one of Iceland's most spectacular and photogenic locations. This glacier lagoon is
studded with floating icebergs, often visited by seals, and sits beside the famous black-sand
Diamond Beach.
In this guide we'll cover exactly where to shoot: the shoreline of the lagoon, boat viewpoints,
Diamond Beach, and even a quick one-day photo plan. You'll get tips on composition, timing
(sunrise/sunset/aurora), and gear to make the most of this iceberg lagoon.
Where Is the Best Place to Take Photos?
The answer: all around the lagoon and nearby. You can shoot right from the water's
edge where icebergs float by, take boat tours to get up close in narrow channels, and visit Diamond
Beach where black sand is strewn with crystal-clear ice "diamonds."
Lagoon Shoreline
Walk right to the water's edge from the main parking area. Great for classic iceberg
compositions with mountain backdrops.
Floating Ice Clusters
The outflow channel under the Ring Road bridge where icebergs gather and drift out to sea
creates dynamic scenes.

Boat Viewpoints
Take a Zodiac or amphibian boat tour to get low-to-water or higher vantage angles of the
icebergs.
Diamond Beach
The black-sand beach nearby is dotted with iceberg chunks – a legendary photo spot with
dramatic contrast.
Best Shoreline Photography Spots
Main Lagoon Edge (Classic Iceberg Compositions)
Start at the main viewing area by the parking lot. Here you can step right to the water's edge and
pick out an interesting piece of ice in the foreground. Compose it with the snowy glacier or
mountains behind, using the still lagoon as a mirror.
On calm mornings the water acts like glass, reflecting clouds and ice for symmetrical shots. We
recommend using a sturdy tripod and a smaller aperture (around f/8–f/11) to get everything sharp
from foreground ice to the background.
Safety Warning
Stay on solid ground and wear crampons if it's icy.
Never climb on or surf
icebergs – they can flip or break loose and send waves in.
Ice Flow Channel Toward the Ocean
At the lagoon's outlet (just under the highway), drifting ice creates dynamic scenes. This channel
often has chunks of ice and rushing water. Fast shutter speeds (≈1/125–1/500 sec) will freeze
splashes and moving ice, while slower speeds (1–2 sec) can blur the rushing water for a "painted"
effect.
Try a mid-telephoto lens to compress a distant iceberg against the horizon, or a wide lens down low
to emphasize the ice in the foreground. Keep an eye out for seals or gulls resting on icebergs
here.
Best Boat Tour Photography Angles
Zodiac Boat Photo Opportunities
Zodiac boats are small, rigid inflatable boats that cut right between icebergs. From a Zodiac you
can get astonishingly close to the ice. This lets you fill the frame with texture shots – think
abstract patterns in the ice or seals lounging on a berg.
A telephoto lens is handy here: you're so close that even 200–400 mm will capture abstract iceberg
details or compress the scene artistically. Tip: Keep your camera and gear
strapped on and expect spray – use lens hoods and wipe fronts frequently.
Amphibian Boat Wide Landscape Views
Amphibian boats (the big "duck" vehicles) give a higher, more stable platform. From these you can
take in panoramic ice-scapes: all around you are big icebergs and open sky. The slower, comfortable
ride makes it easy to walk around deck with a wide-angle lens (for example 16–35 mm) and shoot 180°
vistas.
These tours are family-friendly, so they're great if you have kids or a tripod to set up. The view
is less intimate than a Zodiac, but you'll see every angle of the lagoon in one trip.
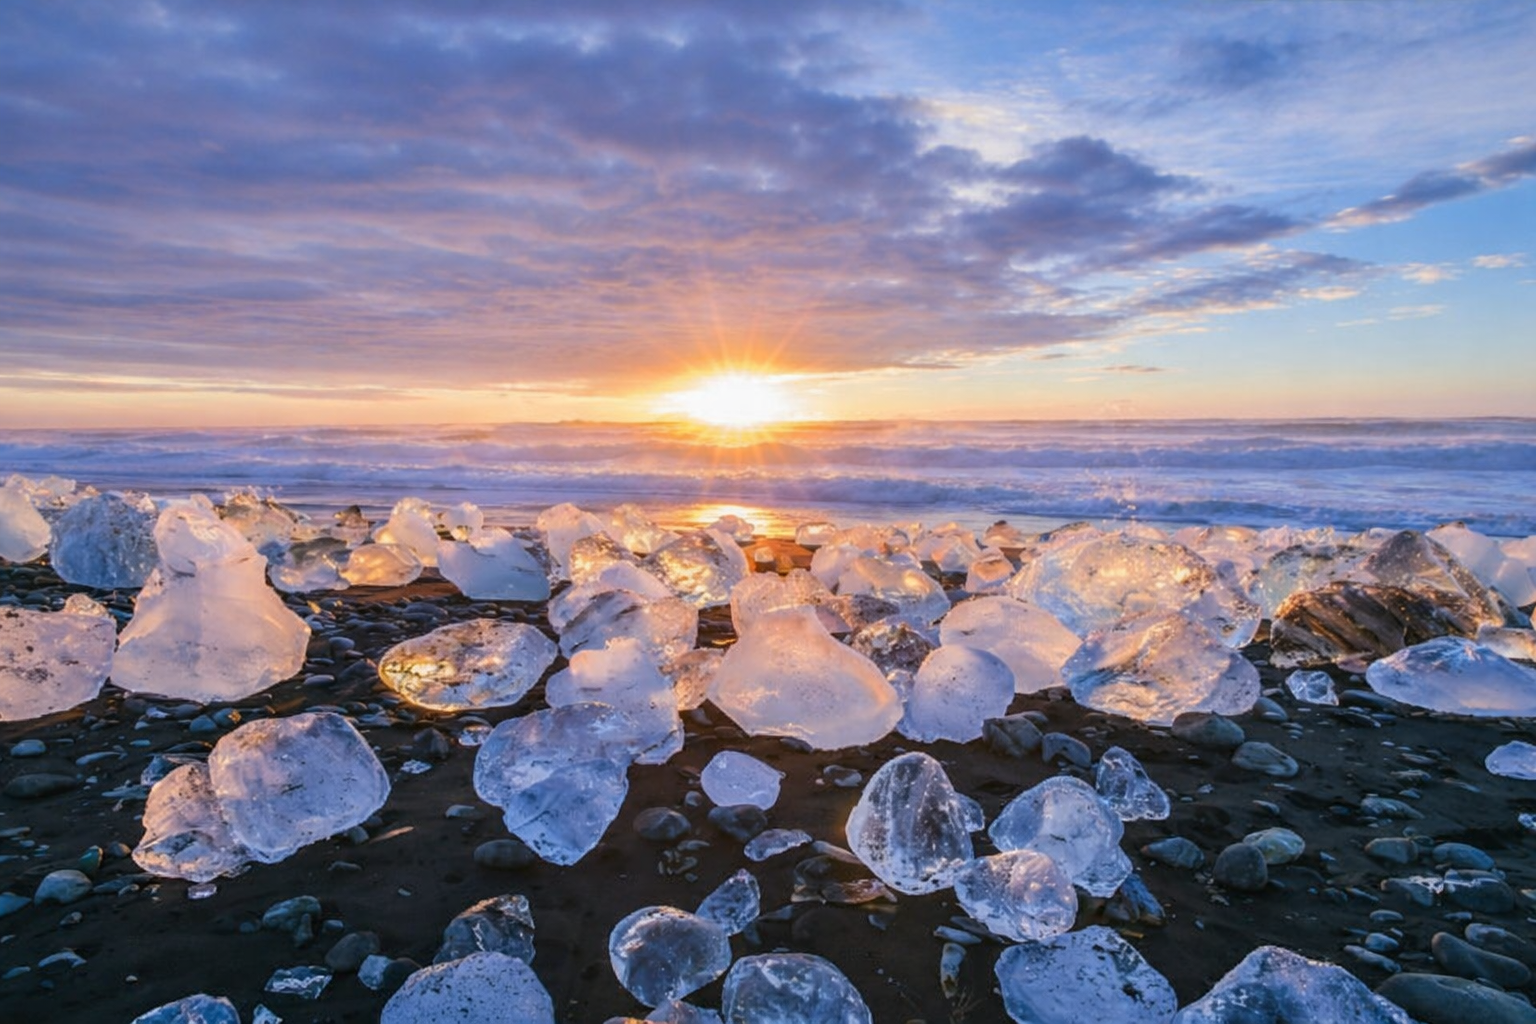
Diamond Beach: The Must-Photograph Spot
Just a mile from the lagoon's outlet is Diamond Beach: a black-sand beach littered
with clear icebergs that have washed ashore. The name comes from how the ice "diamonds" sparkle
against the volcanic sand. This eerie landscape is among Iceland's coolest photo locations.
Sunrise and sunset are especially photogenic here – warm light pours through the ice blocks,
creating colorful glows. But be extremely cautious of waves: unexpected "sneaker"
waves can crash ashore suddenly. Always watch the surf, and don't turn your back on the ocean.
Ice on Black Sand Compositions
Scour the beach for interesting chunks of ice. Pick a clear or blue-tinted piece (those contrast
best with the dark sand) and set it in your composition. Shooting at low angle
(nearly sand-level) exaggerates its size against the sky.
You can even use the sun behind an ice block: align the sunrise/sunset so light streams through the
ice for a "glow" effect. A mid-range aperture like f/8–f/11 keeps the whole ice subject sharp. Try
a short telephoto (70–200 mm) or macro lens to fill the frame with ice textures against the dark
beach.
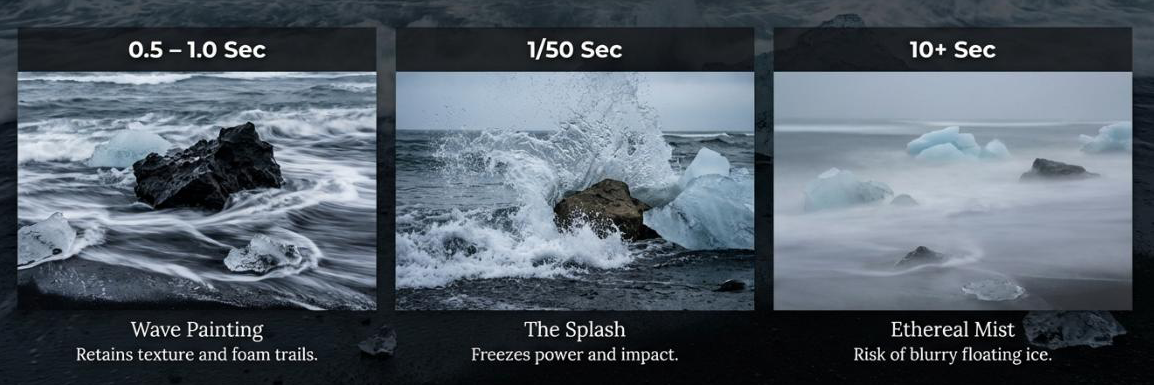
Wave + Ice Motion Shots
Capturing the ethereal "silky" texture of waves wrapping around the ice at Diamond Beach requires the
manipulation of time. A sturdy tripod is non-negotiable; you must often dig the tripod legs inches
into the wet sand to remain stable against the retreating surf.
The image below shows three classic wave effects side-by-side, each achieved by simply changing your
shutter speed. Study these to understand how time transforms the same scene into completely
different photographs:
Mount your camera on a tripod and experiment with different exposure lengths to achieve various
effects. The key is understanding how different shutter speeds create different moods:
| Effect |
Recommended Shutter Speed |
Technical Focus |
| Wave Painting |
1.0 – 2.0 Seconds |
Trigger as the wave recedes for white streaks |
| Wave Crawl |
0.4 – 1.0 Second |
Captures the forward motion of foam |
| Splashing Waves |
1/25 – 1/50 Second |
Freezes the impact of water against the ice |
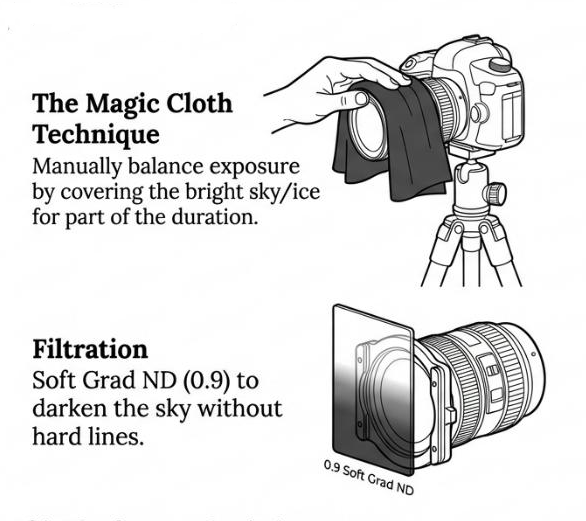
Pro Technique: Magic Cloth &
Filtration
For the most balanced exposures, seasoned pros use the "Magic Cloth"
technique. By manually covering the top half of the lens (the sky) with a dark cloth for part of
a long exposure, you can prevent the bright sky from blowing out while the dark volcanic sand
and ice are properly exposed. Alternatively, a Soft Grad ND (0.9) filter can darken the sky
without the hard lines of a standard graduated filter.
A 3–6 stop ND filter is very helpful (especially on sunny days) to allow those slower speeds. Don't
forget burst mode: the rushing foam can vary wildly, so a burst may capture the perfect moment.
Best Time of Day to Photograph Jökulsárlón
The golden hours (sunrise and sunset) are prime at Jökulsárlón. Low-angle light
paints the ice warm colors and often calms the water for mirror reflections. The brief blue hour
after sundown can also be magical – deep blue skies reflecting on the lagoon's surface, and even
the possibility of auroras if conditions are right.
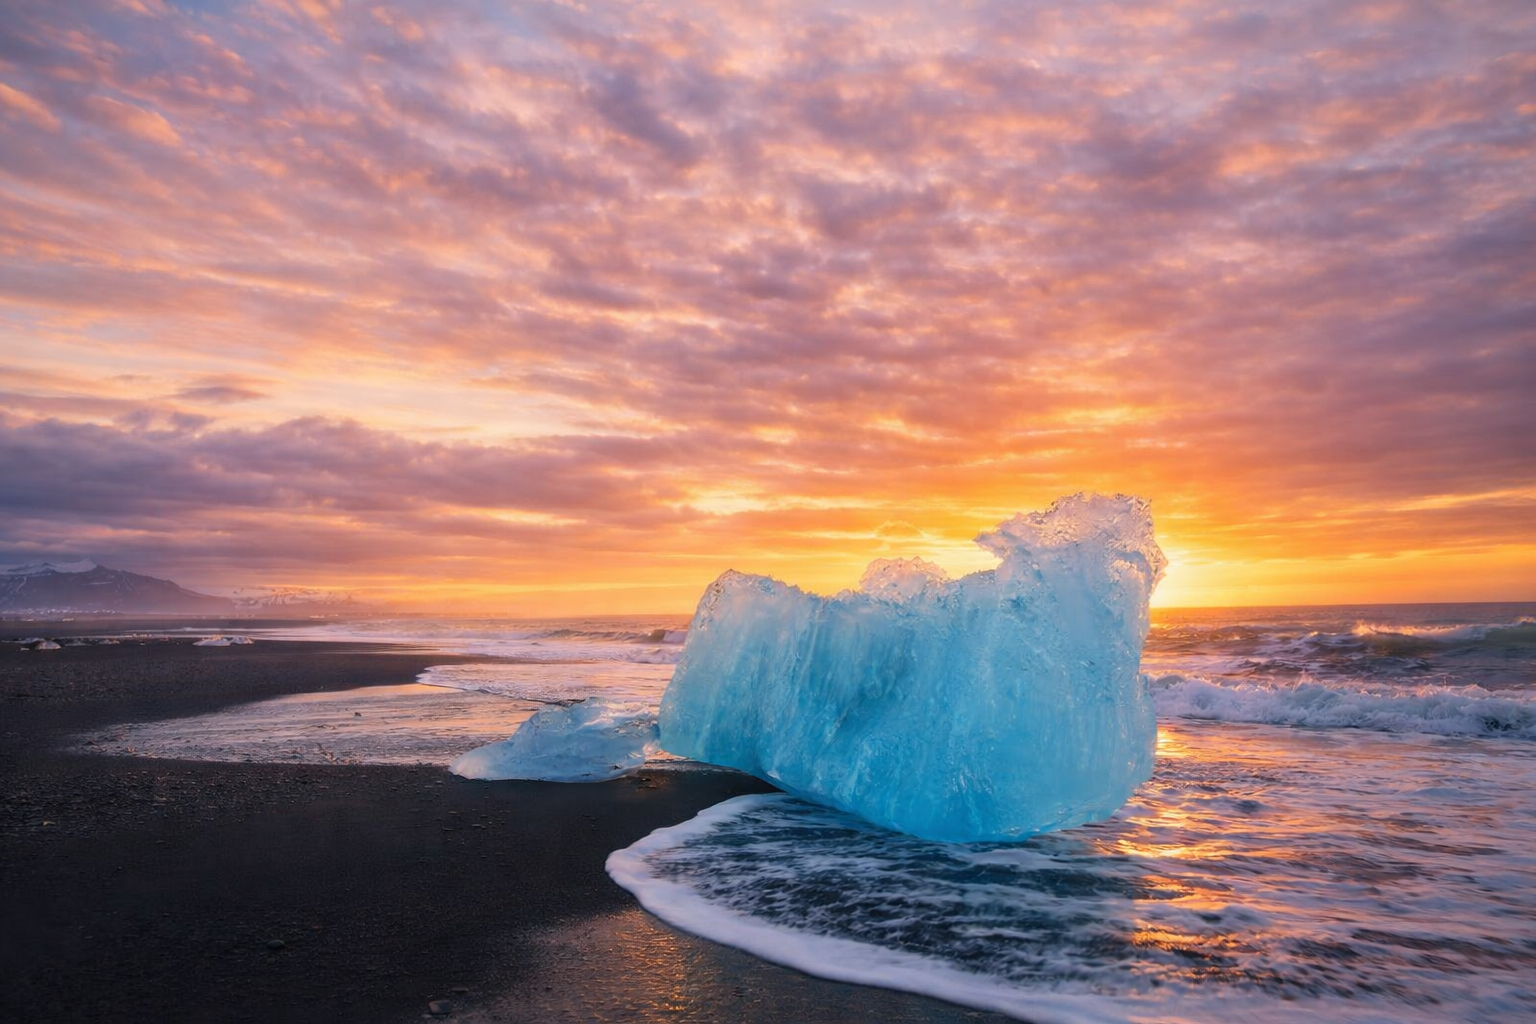
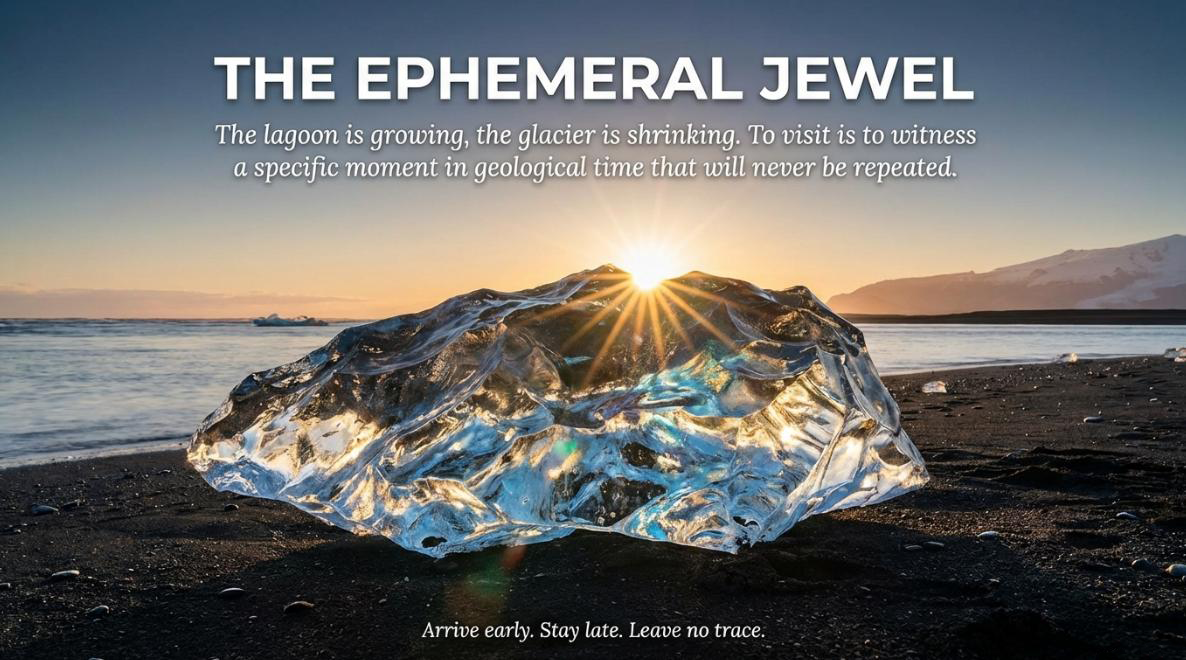
The scene captured below says it all: a crystal-clear ice jewel on Diamond Beach, backlit by the
setting sun with the glacier visible on the horizon. The lagoon is growing, the glacier is
shrinking. To visit is to witness a specific moment in geological time that will never be repeated.
Arrive early. Stay late. Leave no trace.
| Time of Day |
Best For |
Tips |
| Sunrise |
Pastel skies, calm waters, minimal crowds |
Arrive before dawn. Start on Diamond Beach for sun-star effects through ice |
| Sunset |
Golden warm light, long shadows, color reflections |
Return to lagoon for reflections. Try long-exposures of twilight-blue water after
sunset |
| Midday |
Abstract details, texture shots |
Use polarizer to cut glare. Shoot close-ups of ice cracks or bubbles. Fewer
visitors! |
| Blue Hour |
Deep blue reflections, aurora hunting |
Bring tripod. Clear full moon helps illuminate ice. Prime time for northern lights
|
Northern Lights Photography at Jökulsárlón
The Jökulsárlón area is famous for northern lights. With little light pollution, the dark sky can be
ablaze with color above the ice. The flat water and icebergs reflect the dancing aurora, doubling
the effect.
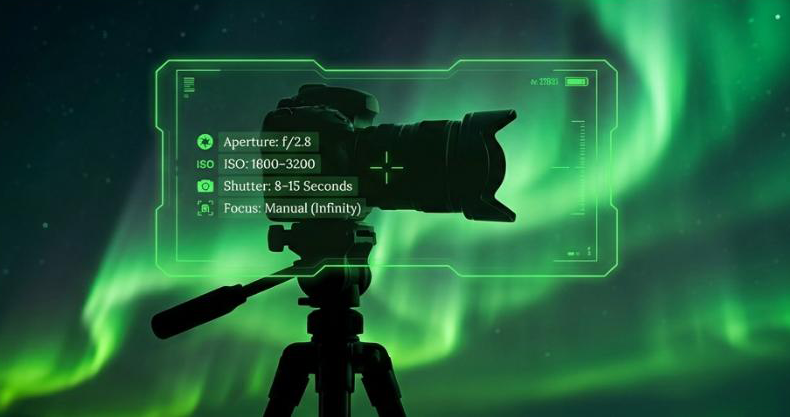
The infographic above summarises the essential aurora settings at a glance. Set your wide-angle lens
wide open at f/2.8, dial the ISO to 1600–3200, and start with
shutter speeds of 8–15 seconds. Focus manually to infinity, and compose with a
foreground iceberg or the beach shoreline as an anchor to give your aurora shots depth and scale.
Safety and prep are key: bring a headlamp, warm clothing, and crampons or spikes for the icy shore.
Stay aware of the ice terrain in the dark. Remember that Jökulsárlón's night scenes are especially
notable in winter months (no chance of auroras in bright summer nights).
Best Lenses for Jökulsárlón Photography
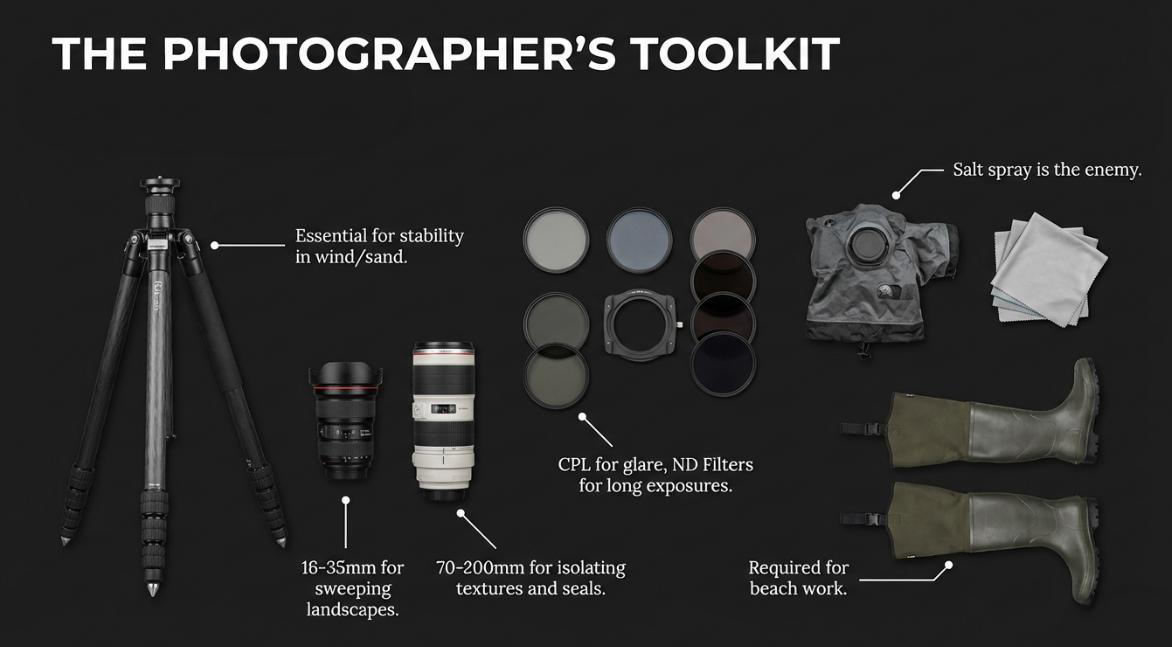
Before diving into lens choices, here's a look at the complete photographer's toolkit for
Jökulsárlón. A carbon-fibre tripod keeps your camera steady in wind and sand. A 16–35 mm wide-angle
captures sweeping landscapes while a 70–200 mm telephoto isolates textures and seals. CPL and ND
filters tame glare and enable long exposures. And don't forget the unglamorous essentials: a rain
cover to fight salt spray and sturdy wellington boots for wading on wet volcanic sand.
Wide Angle (14–35mm)
Best for: Landscapes, sky, aurora panoramas
Get down low to emphasize foreground ice while still capturing the vast lagoon and sky.
Essential for sunrise/sunset wide compositions.
Telephoto (70–200mm+)
Best for: Ice details, wildlife, compression
Isolate distant icebergs, compress layers, or pick out seals and birds. From boats
especially, fills the frame with abstract ice shapes.
Macro (50mm or dedicated)
Best for: Ice textures on beach
Perfect for capturing intricate details in small ice chunks on black sand – reflections,
cracks, air bubbles create dramatic "ice jewel" shots.
Quick Camera Settings Cheat Sheet
| Scenario |
Aperture |
ISO |
Shutter Speed |
Notes |
| Landscapes |
f/8–f/11 |
100–200 |
Varies (use tripod) |
Smaller aperture for full depth of field |
| Moving Ice/Waves |
f/5.6–f/8 |
200–400 |
1/125–1/500 sec |
Freeze motion; or 1–2 sec for creamy waves |
| Aurora |
f/2–f/2.8 |
800–3200 |
5–15 sec |
Wide aperture, adjust for brightness and noise |
| Ice Details |
f/8–f/11 |
100–400 |
1/60+ sec |
Use tripod for sharpness, polarizer for glare |
Pro Tip
Use a sturdy tripod always. Keep ISO as low as practical to avoid
noise. Check histograms
to avoid blown highlights on ice – the bright white can easily overexpose!
Quick Photography Plan (One-Day Visit)
| Time |
Location |
Activity |
| Sunrise |
Lagoon Edge or Diamond Beach |
Shoot with golden light, calm waters, minimal crowds |
| Morning |
Boat Tour |
Take Zodiac or amphibian tour for close-ups of icebergs and seals |
| Midday |
Diamond Beach |
Explore ice on black sand. Use wide/macro lenses, try motion shots with ND filters
|
| Afternoon |
Fjallsárlón or Skaftafell |
(Optional) Check out nearby glacier lagoon or drive to Skaftafell for glacier views
|
| Sunset |
Lagoon Return |
Come back for sunset colors, reflections on ice |
| Night |
Lagoon or Diamond Beach |
If aurora forecast is good, set up with tripod and headlamp for northern lights |
Ready to Capture Iceland's Ice Jewels?
Join a boat tour to get up close to the icebergs, or explore on your own with this complete
photography guide. Either way, you'll come away with stunning shots!
Explore Tours